

I've seen these accordion-folded paper flowers in a lot of scrap layouts, and I wanted to see if I could create one digitally. This tutorial is my result, and although it's not an exact match for the ones which look like they've been scanned, it's pretty close. I may have to tinker with this one some more to see if I can make it look a bit more realistic. Hope you'll find it useful!
This tut was written 9 September 2012 using PSP 9.
The only filter I'm using in this tutorial is MuRa's Meister Copies. It was a free filter when I downloaded it a long time ago. However, the site where it was hosted was a Geocities site which has since closed. If you don't already have the filter, a Google search should turn something up for you.
Let's begin.
1. Open a new transparent canvas. Any size is fine. I'm usually making things for tag-sized kits so I start a bit smaller. If you'd like to follow along with my steps exactly, my canvas is 500 x 500 pixels.
2. In your materials palette, choose whatever color you'd like to use in both the foreground and the background colors. If you're using a pattern, just use that in your background properties and set the foreground the null. The color I'm using in my sample is #5D816B.
3. Activate your Symmetric Shape tool.

4. Once that tool is activated, use the settings shown in the screenshot below, and draw out a shape to fit on your blank canvas.

5. Center your shape in the middle of your canvas. Once centered, convert that shape to a raster layer by right clicking on the name in your Layers Palette and choosing "Convert to Raster Layer."

6. Next, activate your pen tool.

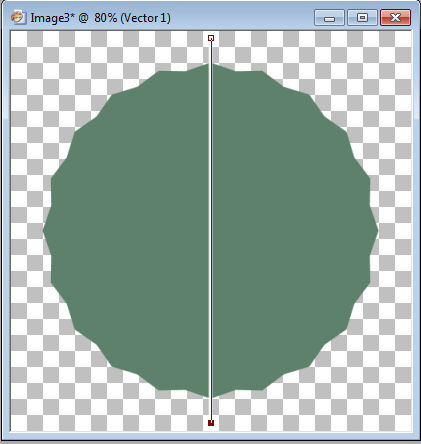
7. After activating the pen tool, change your foreground color to white in the Materials palette, and change the pen tool settings to those shown in the screenshot below. Draw a line vertically across the flower shape we drew earlier. The pen tool draws a vector line and will create a new vector layer automatically in your Layers Palette.

8. To make sure it's perfectly straight, click on the bottom node and move it to the left or right. While still holding down the mouse button, press your shift key and drag the node back toward the center of the canvas. The shift key will make it snap to the center so that the line is straight. (If you keep rotating the line while you're holding down the shift key, it will snap to the 45° position as well. We won't be doing that in this tut, but it's a handy tip to remember.) Once you've gotten your line straight vertically, align it to the center of your canvas the same way we did with the flower shape earlier. Make sure the ends of your drawn line extend beyond the edges of the flower.
9. Once satisfied with the position of your line, convert that layer to a raster layer by right clicking on the layer name in your Layers palette.
10. Find MuRa's Meister in your Plugins list (Effects > Plugins > MuRa's Meister > Copies). Using the settings below, we'll create a circled effect with the line we just drew. When we originally drew the flower shape, you'll remember we drew it with 20 sides. If you drew yours with a different number of sides, just change the first number in the Copies filter to match how many sides your shape has.

11. Next, duplicate this layer we just created. On the duplicated layer, the Brightness needs to be adjusted so that it's black rather than white. Go to Adjust > Brightness & Contrast and lower the brightness setting all the way down (-255). Once darkened, move the black lines layer below the white lines in your Layers Palette.


12. With the black lines layer still active, rotate it by 45°, either right or left is fine. Go to Image > Rotate > Free rotate... or press Ctrl + R.

13. Now merge the white lines layer down to the black lines layer so that you've got a single layer for all those lines. Right click on the top layer of the two in your Layers Palette and choose 'Merge Down.'

Once merged, your canvas should resemble mine as shown in the next image. Notice how the white lines align with the points of the shape; that will become the reflective crease like a piece of paper would have after being folded. The black lines line up with the valleys between the peaks which will create a shadow effect.

14. Once merged, apply a Gaussian Blur to that lines layer. Adjust > Blur > Gaussian Blur, with a setting of Radius = 3. Yours doesn't have to be the same as mine though - fiddle with it, see what looks best on your paper or color.


15. Activate Raster 2 (the flower shape) in your Layers Palette, and choose your Magic Wand tool. It's located in the fly-out menu on your Selection Tool.

16. Using the Magic Wand, click outside the flower shape anywhere in the blank area of the canvas. Once that area is selected, I always modify the selection by smoothing it a bit. Selections > Modify > Smooth...


17. Keep this selection active but change which layer is your active layer in the Layers Palette by clicking on the top lines layer, and hit Delete on your keyboard to remove the lines which extend beyond the shape of your flower. Then deselect (Selections > Select None or Ctrl + D).
18. In your Layers Palette, adjust the opacity and the blend mode of your lines layer. Play with those settings a bit and see which settings look the best. It will vary depending on the color or pattern you've chosen for the flower. For my particular example, I lowered the opacity to about 50% and changed the blend mode to Luminance (Legacy).

19. Basically, the flower shape itself is finished. Yours should resemble mine as shown below at this point.
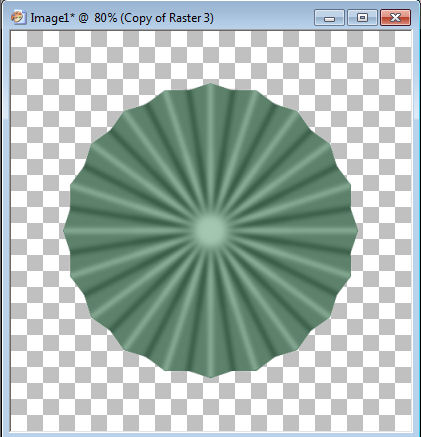
After this point, finish your flower however you'd like. For mine, I added a shiny brad to the center by drawing a circle and then applying a bevel using Eye Candy. I also added a large blurry drop shadow beneath it. You could also use a button or jewel, or anything else you'd like. I also applied a texture to the flower layer before merging all visible layers. After merging visible layers, just crop your canvas to get rid of the excess space around the flower, and you're ready to save it as a .png file.

As always, any results from the tutorial are yours to do with as you please. I hope everything was written clearly enough and that the steps were easy to follow. Feedback is always appreciated!

Fun tutorial....thanks for sharing.
ReplyDelete