

Filter needed: Xenofex 1.1 (I don't think Alien Skin still offers this filter. It's one I've had for a fairly long time.)
1. To begin, open up a new transparent canvas. I usually start with the size of the papers I'm making so for my example, I'll be opening an 800 x 800 pixel canvas. In your materials palette, choose a light shade of whatever color you want your gem to be in the Foreground box. Using the Paint Bucket tool, fill the entire canvas with that light color. In my example, I've used color #E0E0E0, a very light gray color because I want to try to create a diamond.
2. On your menu, choose Adjust > Add/Remove Noise > Add Noise. In the box that opens, select Gaussian, 75% noise, and Monochrome checked, and hit the OK button to apply the effect.
I usually start at around 75%, but adjust that amount to suit your own idea. The more noise you add, the more variation in the gem you'll have in the end result. There's always that handy undo button if you don't like how it looks.

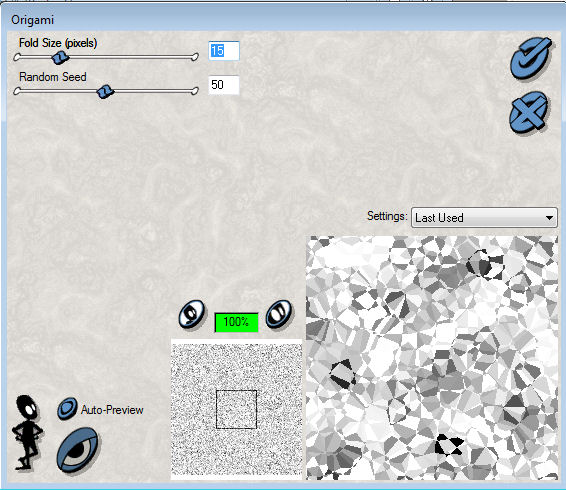
3. After the noise has been applied, you're ready to apply the Xenofex filter. Go to Effects > Plugins > Xenofex 1.1 > Origami. I chose 15 pixels for the Fold Size and 50 for the Random Seed. Those settings are shown in the screenshot below.
The fold size variable will determine the size of the facets, and the random seed slider will just create some randomness in the resulting pattern. Play with both of those settings until you see a result you like. Once you're satisfied, press the checkmark to apply it to your canvas.
4. Right now, you should have a canvas which looks something similar to mine in the screenshot below. Now you're ready to pick out the spot in the canvas that you want to use for the gem.


In the screenshot below, you can see the size of my selection - 200 x 200 pixels.

7. This is an alternative method for choosing your selection area. You can draw out the selection and worry about the size of it first. Then you can move that marquee around to see how different areas of the canvas will look as your gem. Once you've drawn the selection and have the marching ants around a circular area, choose your Move Tool, right-click inside the selection & hold, then you can drag it around the canvas. That's a good way to see how different spots on the canvas will look without having to do/undo over and over.
8. Once you're satisfied with the area you've selected, copy and paste that selection as a new image. Two steps here - 'Edit > Copy' first, then 'Edit > Paste As New Image'. Yours should look something similar to mine below once you've picked an area and copied/pasted it as a new image.

Right now, the gem itself is basically finished. I usually add some kind of setting, either a bezel or a prong setting. Those steps are noted below so continue if you'd like to do the same. Make a copy of your gem canvas (have 2 separate canvases) so you can try both settings if you'd like.
Bezel Setting
1. With your new gem canvas active, increase the canvas size so that you've got some room to work. Image > Canvas Size... and add 50 pixels or so on both the width and height dimensions with center placement selected and hit the OK button to apply.

2. Activate your Magic Wand tool. (It's in the Selection Tool fly-out menu.) Click anywhere in the blank area around the gem to select the empty area. Invert your selection, Selections > Invert. Now the marching ants should be circling the edge of the gem.
3. Go to Selections > Modify > Expand. I chose 7 pixels for my example, but choose whatever size you think will look good on your gem. With the selection still active, go to Selections > Modify > Smooth and enter the following values - Smoothing amount 10, Corner scale 2, and both Anti-alias and Preserve corners checked. Hit the OK button to apply. Again, this just seems to make the bezel we're adding look a bit smoother around the edges.

4. Keep the selection active; don't deselect just yet. Add a new raster layer - this is where we'll be adding the bezel setting.
5. I'm going to add a metallic gradient so you can pick any gradient you might already have (silver, gold, bronze, etc.) or we'll make our own here. For my example, I used my pale gray color in the foreground box (#E0E0E0), and I chose a dark gray for my background (#646464). Click on your foreground color in the Materials palette to open up the palette menu. Change from the Color tab to the Gradient tab. Choose Foreground-Background gradient, with a 45° angle, 3 repeats, and Linear style, and hit the OK button.
As an alternative, if you have any of the Eye Candy filters and wanted to use a Chrome filter here, you could opt to do that rather than choosing/making a gradient to use as a fill.

6. Make sure the new raster layer we added is still the active layer in your Layers palette. Using the Paint Bucket tool, fill this selection with the gradient you just chose or made. Your canvas will look something like mine below. You can see both layers in my canvas on the right of the screenshot.

7. You can deselect now. Choose your top layer and move it to the bottom of your layers so that the metallic fill layer is on the bottom and your gem is back on top. Merge the visible layers (Layers > Merge visible), and you've got a bezel set gemstone similar to mine shown below.

Prong Setting
1. For a different result, you could choose to make a prong setting. Have your new canvas that we made in the beginning with the gemstone active. Increase your canvas size so you've got room to work. Image > Canvas Size - add 50 pixels to both the width and height dimensions with center placement selected, hit the OK button to apply.
2. I chose a gold gradient that I already had in my gradients to use for this step. Just choose one you might have that you'd like to use. I chose the gradient in my Background/Fill material box with a 0° angle, no repeats, and circular style. I also checked the Invert box, but that will be based on how your gradient is set up. Just choose whichever (checked or unchecked) allows your gradient to have the lighter shade in the center.

3. Choose your Preset Shapes tool and select the Teardrop shape. Set the Line width to 0 so that there's no outline on your shape. If you don't have a Teardrop shape, the basic Ellipse vector shape works just fine too.

4. Draw a small shape on your canvas. Leave this shape as a vector object and choose Image > Rotate > Free Rotate. Keeping it as a vector shape will keep it from getting blurry when we rotate it. In the window that opens, enter a 45° rotation, direction doesn't really matter, but make sure the All Layers box is UNchecked. That way only the new shape you just drew gets rotated, not the whole canvas. And hit the OK button to apply.

5. Move the prong where you'd like it to be on the edge of your gem and then convert it to raster.
6. Add an inner bevel to the prong. My settings are shown below. If my settings don't look very good on your result, you can play with the settings until you get something you like. The bevel will really probably depend on the size you're making, placement, etc. So my settings may not work as well on your result.

7. Duplicate the layer with your new prong then flip the duplicated layer. (Image > Flip) Duplicate your new top layer and mirror it. (Image > Mirror) Duplicate this new top layer again and choose flip again. After duplicating, flipping, and mirroring, you'll have four layers, each with a prong of its own on the four corner edges of your gem.
8. Hide the bottom layer with your gemstone in your layers palette by clicking on the eye for that layer. Merge the 4 remaining visible layers (Layers > Merge > Merge Visible) so that all the prongs are on a single layer. Once done with those steps, your canvas should look similar to mine below.

9. Unhide the gem layer by clicking on the eye beside that layer again. Make sure your merged prong layer is the one which is active in your Layers palette, and apply a large blurry drop shadow to those prongs. Effects > 3D Effects > Drop Shadow. My settings were 0, 0, 50, 10, black, and be sure to check the box for Shadow on new layer. Hit the OK button to apply.

10. Activate your gem layer (Raster 1 in my layers). Choose your Magic Wand tool again and click in the open area around the shape.
11. Activate your shadow layer in the Layers palette and hit Delete on your keyboard. That will remove the shadow around the gem shape but leave the shadow over top of the gem between the prongs and gem. Now you can merge visible and save your file. Your result should look something similar to mine as below.

This was a very long tut with a lot of different steps, but I hope it was easy enough to follow with enough screenshots to explain what I was doing in each stage. Hope everyone who tries it has learned something new and been able to create a few bits of their own. Any results you create from my tutorial are yours to do with as you please. This tutorial is based on the method I use myself when I make a gem, and any similarity to another tutorial is purely coincidence. Feedback is always appreciated! Good, bad, or otherwise :)

great tut. I am sending this link to my designers who are looking for PSP tuts on scrap book stuff.
ReplyDeletehugs
echo
from SouthernComfortScraps
Thank you, I have been trying to figure out how to make gemstones so this is great.
ReplyDeleteSoDa